
This guide provides step-by-step instructions for configuring your AI agent as a powerful personal email assistant. Learn how to automate sorting, drafting, and forwarding to reclaim your time and focus on what matters most.
Step 1: Define your AI agent's mission
Before you begin, consider what you want your AI agent to achieve. Everyone's email management style is unique, so the key is to tailor its tasks to your specific workflow. Start by envisioning your ideal process: what tedious tasks would you eliminate? What would make you feel most in control of your inbox?
Here are the core functions to consider delegating to your AI assistant.
Automated email sorting
Think about how you mentally process incoming mail. Many emails today require no action, some just need to be read, and others are only useful for future searches and don't even need to be read. Your AI can handle this categorization for you.
Inspiration: An effective sorting system
Here is an example of a sorting structure used by our CEO. Use it as inspiration to build your own:
-
To Respond: Items that require your attention and need a reply or action.
-
FYI: Information shared for your awareness that does not require a response, but are important to read.
-
Awaiting Reply: Messages or requests for which you are waiting on a response.
-
Finished: Completed tasks or conversations that no longer require action.
-
Comments: Feedback or notes from collaboration platforms.
-
Notifications: Alerts and updates from the software you use.
-
Meeting Updates: Calendar invites, changes, or booking confirmations.
-
Marketing: Newsletters, cold sales pitches everything that can be interesting to quickly scan through, but a lot of the time is not relevant.
This is just one template. The goal is to design a structure that fits your needs and provide those instructions to your AI assistant.
Intelligent email forwarding
Not all emails are sent to the right person. Managers, in particular, often receive emails intended for other team members. Instead of manually rerouting these requests, you can empower your AI to instantly forward them to the right person.
For example, if a customer emails you about a technical problem with your product, the AI can automatically forward the message to your support team, ensuring a faster resolution without your direct involvement.
AI-Powered email drafting
Your AI assistant can also become a proactive partner in writing your emails. By learning from your past communications, it can draft replies that sound authentically like you, saving you from rewriting the same messages. The AI learns your specific tone and style, ensuring consistency in every interaction.
Imagine a customer asks about a recent invoice. Instead of you searching for the details, the AI can access your accounting software, retrieve the information, and draft a precise, helpful reply for your approval. This not only accelerates your response time but also builds a powerful knowledge base. The more you use it, the smarter it gets, handling increasingly complex queries with minimal input.
By integrating a well-defined AI into your email management, you can streamline your communication, ensuring every response is timely, accurate, and reflective of your professional style.
Conclusion
This and many more workflows are possible, if you can put it into an instruction an AI can handle it for you.
Step 2: Understanding outlook folders vs. categories
A crucial step in designing your email workflow is understanding the fundamental difference between folders and categories in Outlook. Choosing the right tool for the job will determine whether your system clarifies or complicates your inbox.
Folders: For archiving and separation
Think of folders as physical filing cabinets. When you move an email to a folder, you are taking it out of your main inbox and storing it elsewhere. This is an "out of sight, out of mind" approach.
-
Best for: Emails you don't need to act on immediately but want to keep for reference. This includes newsletters, receipts, completed project communications, or low-priority notifications.
-
Goal: To achieve "inbox zero" or simply to reduce clutter in your primary workspace. You intentionally go to these folders when you need to find something specific instead of it cluttering your inbox.
Categories: For labeling and prioritization
Think of categories as color-coded sticky notes or tags. When you apply a category to an email, it remains in your inbox but is visually tagged for easy identification. An email can even have multiple categories.
-
Best for: Emails that need to stay in your inbox but require a specific type of attention. This is ideal for managing active tasks, tracking priorities, or grouping related conversations that are still ongoing.
-
Goal: To add a layer of visual organization directly within your inbox, allowing you to see at a glance what needs to be done without losing context. You can sort or filter your inbox by category to focus on specific tasks.
In short, use folders to file things away and categories to see at a glance what action an email requires.
Step 3: Setting up everything in Chathive
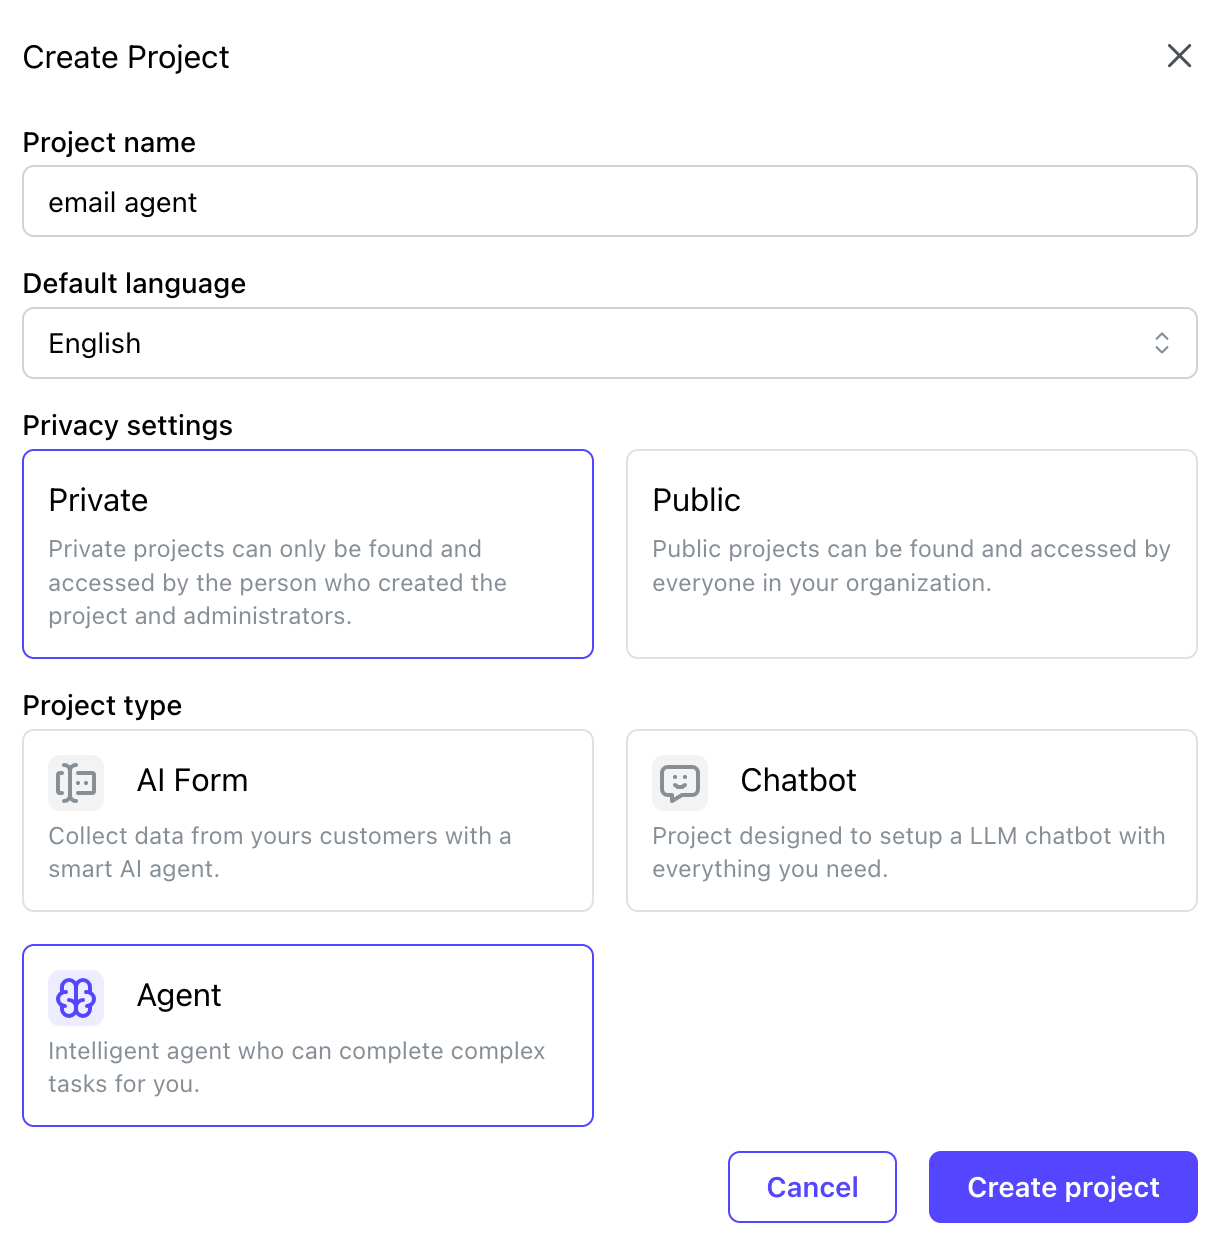
To set this up in Chathive, you should create a new project, set it to private (as you don’t want others to be able to see your emails), and select type "agent." Change the language you want to prompt in; the AI will be able to reply in all languages.
Next, you should enter your prompt with the instructions the agent should follow. Here is a quick template you can use (fill in all tags ([]) with your own details)
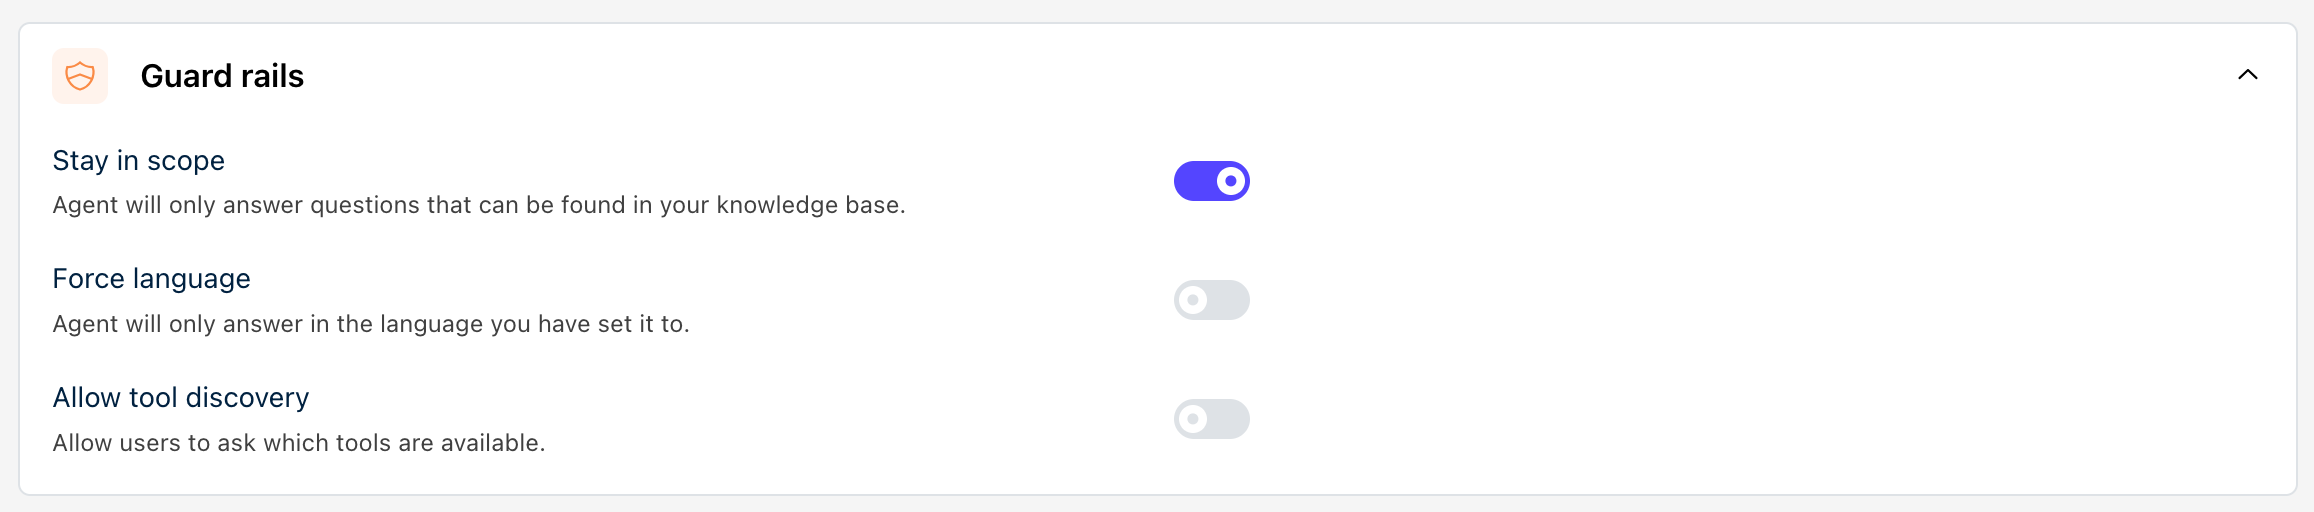
Disable the "force language" guardrail, as this prohibits the AI from answering in languages other than the one your agent is set up in.
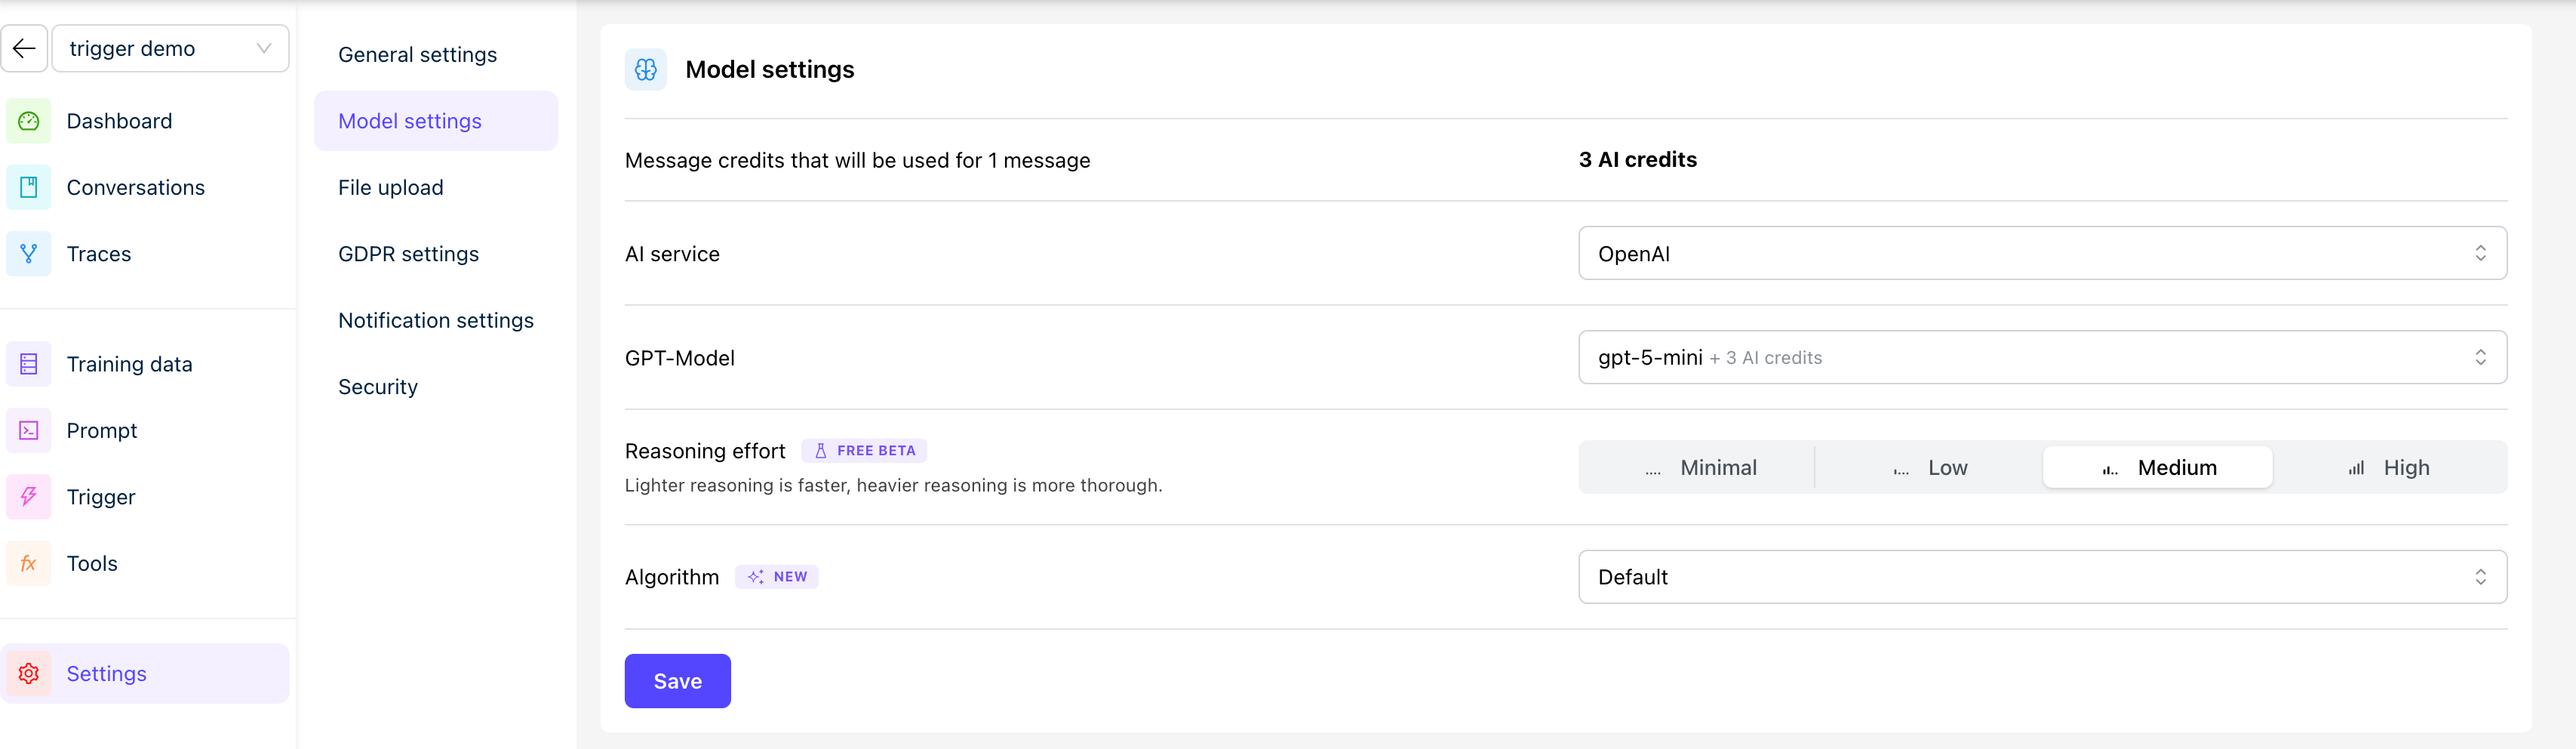
Then go to Settings > Model Settings and choose a model that fits your needs. We generally recommend GPT 5 mini with medium reasoning for the best balance of cost vs. performance. You don’t need the fusion algorithm unless you add a lot of knowledge to your agent.
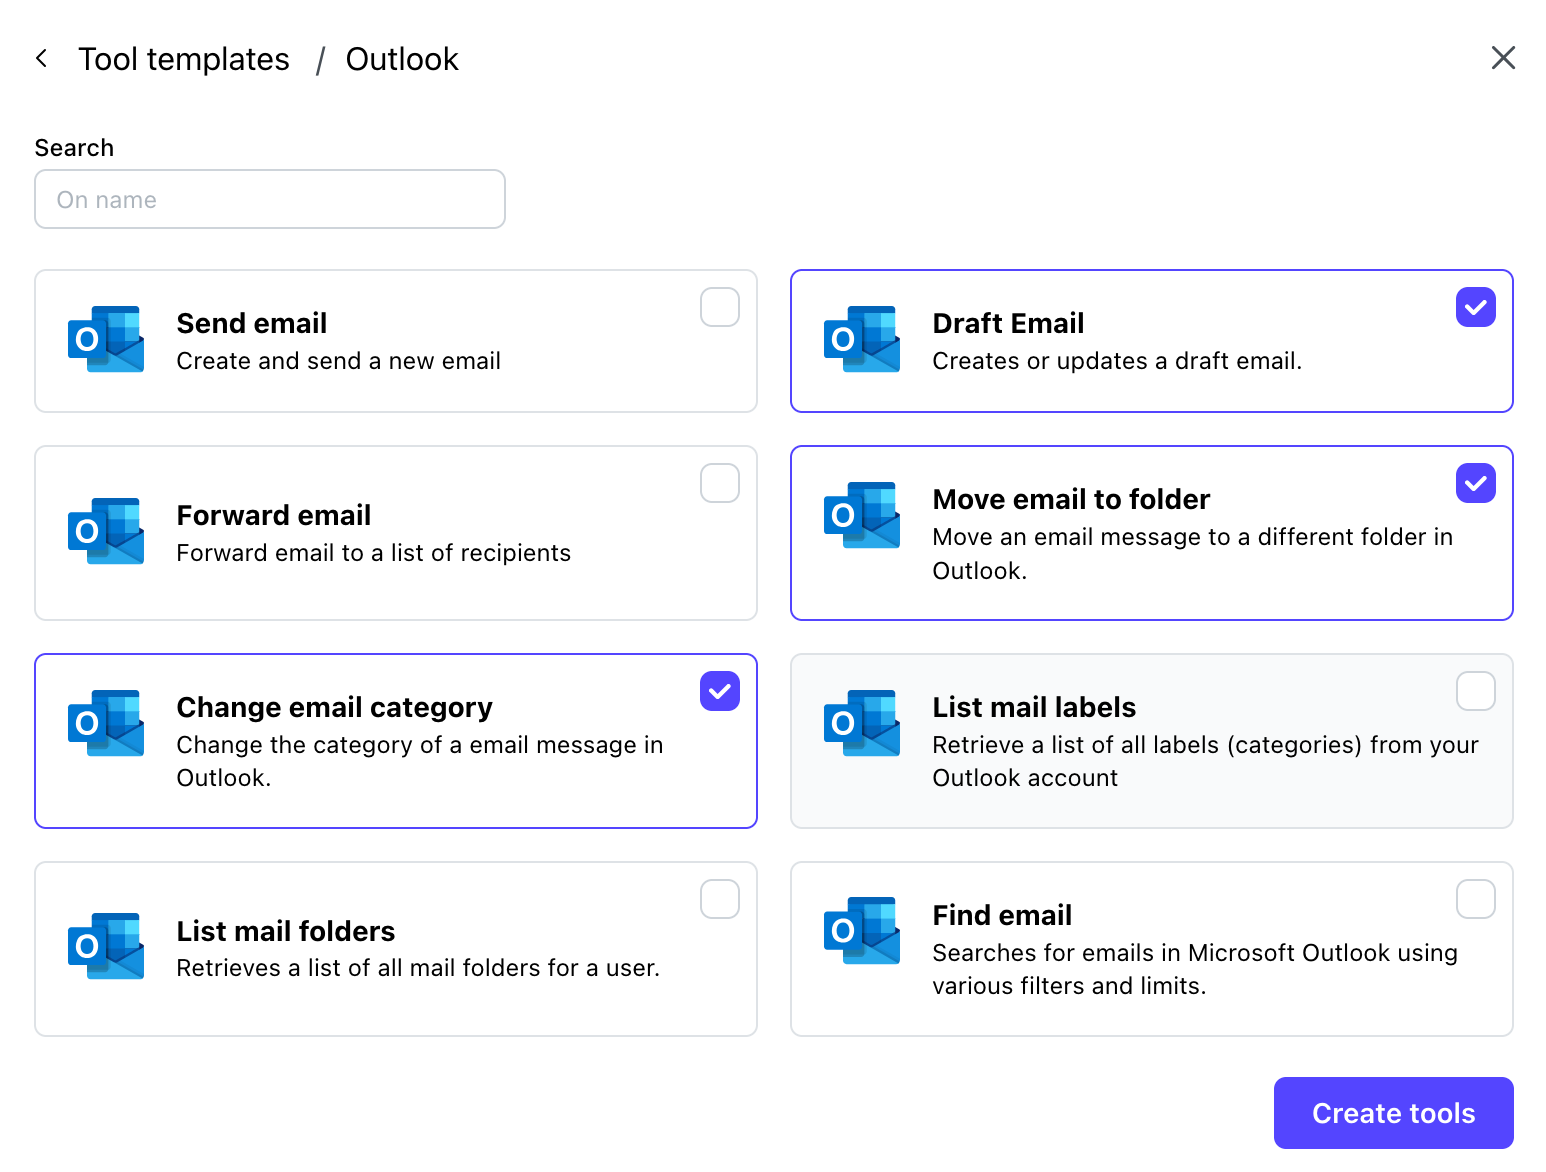
Then, go to Tools and add all the Outlook tools the system needs to execute your instructions. Most of the time, you need either “change email category,” “move email to folder,” or both. If you want auto-drafting or forwarding, add these tools as well.
Lastly, go to Triggers and add an "email received" trigger for Outlook. When you activate this, your automation will start running, which is why we recommend doing this last.
Step 4: Finetuning your prompt
You should optimize your prompt as you go. Observe what your agent does and refine the instructions accordingly. A general rule of thumb is to treat your AI agent as a new intern who is not intelligent and needs explicit instructions and has no context about your work. They will only do exactly what you write down. Keep adjusting your prompt until the agent behaves precisely as you want.
Conclusion: Reclaim your focus and evolve your system
Getting started with an AI email assistant is about more than just a cleaner inbox, it's about fundamentally redesigning your relationship with email. By automating the most repetitive and time-consuming tasks, you free up valuable mental energy for the strategic work that truly requires your expertise and creativity.
Don't aim for perfection on day one. Start with one simple function, like sorting notifications into a folder, and observe how it works. As you build trust in the system, gradually expand your AI's responsibilities. The initial investment in setup and fine-tuning will pay dividends in productivity, reduce cognitive load, and ultimately give you back control of your day. This isn't just a tool; it's a dynamic system that grows with you, becoming an indispensable partner in your success.